

Heyyyy folks, everybody good? Ready to talk a little more about the dolphin database?
⚠️ CONTAINS TEXT IMPROVED BY AI, AND THAT’S TOTALLY FINE (IF YOU KNOW HOW TO USE IT 🤭) ⚠️
In this article I’m going to cover the InnoDB Cluster setup (and show you how it’s done too), plus a few details on how to administer it, monitor it and so on, nothing out of this world. And no, it’s not like Oracle RAC, but it’s every bit as cool.
What is MySQL InnoDB Cluster?
InnoDB Cluster is MySQL’s native high availability architecture, combining automagic replication, built-in failover and scalability for the whole thing. It uses Group Replication to synchronize database instances, keeping the nodes consistent and letting you distribute workloads. Again, there’s really nothing like Oracle RAC 😆 (period).
Let’s get to the architecture:
The architecture of a MySQL high availability cluster with Group Replication:
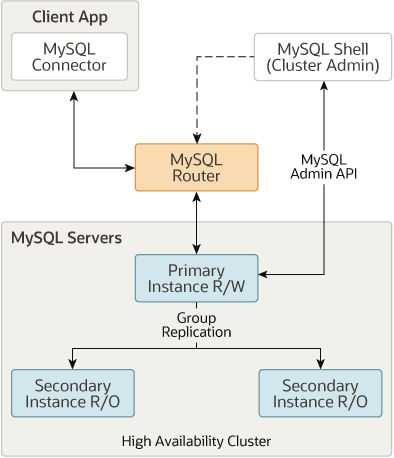
Components:
- Client App:
- Represents the user applications that connect to the database.
- Uses the MySQL Connector to communicate with the cluster through MySQL Router.
- MySQL Router:
- A middleware layer that sits between the applications and the MySQL servers.
- Routes read/write requests to the primary node (Primary Instance R/W) and spreads reads across the secondary nodes (Secondary Instances R/O), depending on the configuration.
- MySQL Shell (Cluster Admin):
- An administration interface used to manage the cluster.
- Relies on the MySQL Admin API to configure and monitor the cluster, including bootstrapping Group Replication.
- MySQL Servers:
- Primary Instance R/W:
- The main node, which handles read and write operations.
- Takes part in Group Replication, making sure changes get propagated to the secondary nodes.
- Secondary Instances R/O:
- Secondary nodes configured for real-time replication.
- Used mainly for read operations, which optimizes the cluster’s performance.
- Primary Instance R/W:
How it works:
- Group Replication:
- MySQL’s native replication protocol, used to synchronize data between the primary node and the secondary nodes.
- Makes sure every instance stays up to date with the changes made on the primary node.
- High availability:
- If the primary node fails, one of the secondary nodes can be automatically promoted to primary to keep the service running.
- MySQL Router automatically adjusts its routing to reflect the change.
InnoDB Cluster setup
Now I’m going to show you, step by step, how to set up the cluster.
What’s on the agenda for this ride:
- Topology
- Prerequisites
- Installing MySQL and its components (MySQL Shell and whatnot)
- Configuring my.cnf
- Cluster setup via MySQL Shell
- MySQL Router setup
- Availability test
The topology of this whole thing
- myorcl1
- 192.168.10.101
- myorcl2
- 192.168.10.102
- myorcl3
- 192.168.10.103
- myrouter
- 192.168.10.100
Prerequisites (from my environment, haha)
- Ubuntu 20
- RAM 8GB
- HDD 40GB
- MySQL Server 8
- MySQL Shell 8
- MySQL Router 8
- “DNS”
- /etc/hosts config
127.0.0.1       localhost

# Configuração dos nós do cluster
192.168.61.101  myorcl1
192.168.61.102  myorcl2
192.168.61.103  myorcl3

# Configuração do MySQL Router
192.168.61.100  myrouter
Installing MySQL and its components (MySQL Shell and whatnot)
Step 1: Installing MySQL and MySQL Shell on Ubuntu
Install MySQL Server
Run the commands below on every server in the cluster (myorcl1, myorcl2, myorcl3):
Update the system packages
sudo apt update && sudo apt upgrade -y
Add the MySQL repository
Download and add the official MySQL repository:
wget https://dev.mysql.com/get/mysql-apt-config_0.8.26-1_all.deb
sudo dpkg -i mysql-apt-config_0.8.26-1_all.deb
sudo apt update
Install MySQL Server
Install the MySQL Server version you want (for example, 8.0):
sudo apt install -y mysql-server
Check that the service is running
Start MySQL and enable it to start at boot:
sudo systemctl start mysql

sudo systemctl enable mysql

Synchronizing state of mysql.service with SysV service script with /lib/systemd/systemd-sysv-install.
Executing: /lib/systemd/systemd-sysv-install enable mysql

sudo systemctl status mysql

● mysql.service - MySQL Community Server
   Loaded: loaded (/lib/systemd/system/mysql.service; enabled; vendor preset: enabled)
   Active: active (running) since Fri 2024-12-29 10:15:32 UTC; 5min ago
 Main PID: 12345 (mysqld)
    Tasks: 37 (limit: 4915)
   Memory: 148.4M
   CGroup: /system.slice/mysql.service
           └─12345 /usr/sbin/mysqld

Dec 29 10:15:32 ubuntu-server systemd[1]: Started MySQL Community Server.
Run the initial MySQL configuration
Use MySQL’s initial configuration utility to set the password and other settings, just follow what shows up on screen and be happy:
sudo mysql_secure_installation
Install MySQL Shell
Install MySQL Shell
MySQL Shell can be installed with the following command:
sudo apt install -y mysql-shell
Verify the MySQL Shell installation
Confirm that MySQL Shell is installed:
mysqlsh --version
Configure MySQL to accept external connections
Via the root user:
UPDATE mysql.user SET host = '%' WHERE user = 'root' AND host = '127.0.0.1';
FLUSH PRIVILEGES;
Via bind-address:
sudo vi /etc/mysql/mysql.conf.d/mysqld.cnf
bind-address = 0.0.0.0
Firewall ports used by MySQL InnoDB Cluster
| Port | Protocol | Purpose |
|---|---|---|
| 3306 | TCP | Connections to the MySQL database. |
| 33061 | TCP | Group Replication internal communication. |
| 6446 | TCP | MySQL Router (optional, adjust as needed). |
| 22 | TCP | SSH (optional, for remote administration). |
Configuring my.cnf
vi it, at the very least: /etc/my.cnf
MYorcl1
[mysqld]
server-id=1
log_bin=mysql-bin
binlog_checksum=NONE
gtid_mode=ON
enforce_gtid_consistency=ON
master_info_repository=TABLE
relay_log_info_repository=TABLE
transaction_write_set_extraction=XXHASH64
loose-group_replication_group_name="aaaaaaaa-aaaa-aaaa-aaaa-aaaaaaaaaaaa"
loose-group_replication_start_on_boot=OFF
loose-group_replication_local_address="192.168.10.101:33061"
loose-group_replication_group_seeds="192.168.10.101:33061,192.168.10.102:33061,192.168.10.103:33061"
loose-group_replication_bootstrap_group=OFF
bind-address=192.168.10.101
report_host=192.168.610.101
port=3306
myorcl2
[mysqld]
server-id=2
log_bin=mysql-bin
binlog_checksum=NONE
gtid_mode=ON
enforce_gtid_consistency=ON
master_info_repository=TABLE
relay_log_info_repository=TABLE
transaction_write_set_extraction=XXHASH64
loose-group_replication_group_name="aaaaaaaa-aaaa-aaaa-aaaa-aaaaaaaaaaaa"
loose-group_replication_start_on_boot=OFF
loose-group_replication_local_address="192.168.10.102:33061"
loose-group_replication_group_seeds="192.168.10.101:33061,192.168.10.102:33061,192.168.10.103:33061"
loose-group_replication_bootstrap_group=OFF
bind-address=192.168.10.102
report_host=192.168.610.102
port=3307
myorcl3
[mysqld]
server-id=3
log_bin=mysql-bin
binlog_checksum=NONE
gtid_mode=ON
enforce_gtid_consistency=ON
master_info_repository=TABLE
relay_log_info_repository=TABLE
transaction_write_set_extraction=XXHASH64
loose-group_replication_group_name="aaaaaaaa-aaaa-aaaa-aaaa-aaaaaaaaaaaa"
loose-group_replication_start_on_boot=OFF
loose-group_replication_local_address="192.168.10.103:33061"
loose-group_replication_group_seeds="192.168.10.101:33061,192.168.10.102:33061,192.168.10.103:33061"
loose-group_replication_bootstrap_group=OFF
bind-address=192.168.10.103
report_host=192.168.610.103
port=3308
myrouter
[mysqld]
server-id=4
bind-address=192.168.10.100
report_host=192.168.10.100
port=6446
Cluster setup via MySQL Shell
Examples of how to log in to MySQL Shell:
mysqlsh --user=root --password --host=192.168.10.101 --port=3306 --js
mysqlsh --user=root --password --host=192.168.10.102 --port=3307 --js
mysqlsh --user=root --password --host=192.168.10.103 --port=3308 --js
On the myorcl1 node, let’s configure the instance:
mysql-js > dba.configureInstance();

Creating configuration for instance 'myorcl1'
Instance 'myorcl1' configured successfully.
Still on myorcl1, we create the cluster:
mysql-js > var cluster = dba.createCluster("ClusterBrabo");

Creating cluster 'ClusterBrabo'...
Cluster 'ClusterBrabo' created successfully.
The cluster will be available once it is fully initialized.
Initializing cluster 'ClusterBrabo'...
Configuring instance 'myorcl1' for inclusion in the cluster...
Cluster 'ClusterBrabo' initialized and instance 'myorcl1' added successfully.
Still on myorcl1, add the myorcl2 and myorcl3 nodes to our cluster:
mysql-js > cluster.addInstance('root@192.168.10.102:3307');

Adding instance 'root@192.168.10.102' to cluster 'ClusterBrabo'...
Verifying the instance is running and accessible...
Verifying MySQL Group Replication status...
Configuring instance 'root@192.168.10.102' for Group Replication...
Adding instance 'root@192.168.10.102' to the cluster...
Instance 'root@192.168.10.102' added successfully to cluster 'ClusterBrabo'.

mysql-js > cluster.addInstance('root@192.168.10.103:3308');

Adding instance 'root@192.168.10.103' to cluster 'ClusterBrabo'...
Verifying the instance is running and accessible...
Verifying MySQL Group Replication status...
Configuring instance 'root@192.168.10.103' for Group Replication...
Adding instance 'root@192.168.10.103' to the cluster...
Instance 'root@192.168.10.103' added successfully to cluster 'ClusterBrabo'.
Let’s run a check on this thing:
mysql-js > cluster.status()
{
  "clusterName": "ClusterBrabo",
  "defaultReplicaSet": {
    "name": "default",
    "primary": "myorcl1:3306",
    "ssl": "REQUIRED",
    "status": "OK",
    "statusText": "Cluster is ONLINE and can tolerate up to ONE failure.",
    "topology": {
      "myorcl1:3306": {
        "address": "myorcl1:3306",
        "memberRole": "PRIMARY",
        "mode": "R/W",
        "readReplicas": {},
        "replicationLag": null,
        "role": "HA",
        "status": "ONLINE",
        "version": "8.0.23"
      },
      "myorcl2:3307": {
        "address": "myorcl2:3306",
        "memberRole": "SECONDARY",
        "mode": "R/O",
        "readReplicas": {},
        "replicationLag": null,
        "role": "HA",
        "status": "ONLINE",
        "version": "8.0.23"
      },
      "myorcl3:3308": {
        "address": "myorcl3:3306",
        "memberRole": "SECONDARY",
        "mode": "R/O",
        "readReplicas": {},
        "replicationLag": null,
        "role": "HA",
        "status": "ONLINE",
        "version": "8.0.23"
      }
    },
    "topologyMode": "Single-Primary"
  },
  "groupInformationSourceMember": "myorcl1:3306"
}
MySQL Router setup
MySQL Router is a tool that sits between the clients (applications or users) and the InnoDB Cluster. It routes connections to the right cluster nodes depending on the type of operation you want to perform.
on myrouter:
wget https://dev.mysql.com/get/Downloads/Router/mysql-router_8.0.40-1_amd64.deb

sudo dpkg -i mysql-router_8.0.40-1_amd64.deb

sudo apt-get install -f
mysqlrouter --bootstrap root@192.168.10.100:3306 --directory /path/to/mysqlrouter/data
Now, let’s configure MySQL Router:
sudo vi /etc/mysqlrouter/mysqlrouter.conf
[logger]
level = INFO
file = /var/log/mysqlrouter.log

[mysql-router]
user = mysql
socket = /var/lib/mysql/mysql.sock
connect_timeout = 10000
client_address = 0.0.0.0
client_port = 6446

[health]
enabled = true
check_interval = 10
where:
- client_address: Sets the IP or hostname MySQL Router will listen on.
- client_port: The port the Router will listen on (e.g. 6446).
- connect_timeout: The connection timeout.
- read_timeout: The read timeout.
Check out these examples of how to connect through the router:
# Conexão de Leitura e Escrita (R/W)
# O MySQL Router redirecionará a conexão para o nó PRIMARY.
mysql -u root -p -h 192.168.61.100 -P 3306

# Conexão Somente Leitura (R/O)
# O MySQL Router redirecionará a conexão para um dos nós SECONDARY.
mysql -u root -p -h 192.168.61.100 -P 3307

# Verifica o nó ao qual você está conectado
SELECT @@hostname, @@port, @@server_id, @@read_only;
Availability test
Now let’s stop myorcl1 and see what happens:
sudo systemctl stop mysql
Let’s run a check now:
mysql-js > cluster.status()
{
  "clusterName": "ClusterBrabo",
  "defaultReplicaSet": {
    "name": "default",
    "primary": "myorcl2:3306",
    "ssl": "REQUIRED",
    "status": "OK",
    "statusText": "Cluster is ONLINE but cannot tolerate further failures.",
    "topology": {
      "myorcl1:3306": {
        "address": "myorcl1:3306",
        "memberRole": "UNREACHABLE",
        "mode": "R/W",
        "readReplicas": {},
        "replicationLag": null,
        "role": "HA",
        "status": "OFFLINE",
        "version": "8.0.23"
      },
      "myorcl2:3307": {
        "address": "myorcl2:3306",
        "memberRole": "PRIMARY",
        "mode": "R/W",
        "readReplicas": {},
        "replicationLag": null,
        "role": "HA",
        "status": "ONLINE",
        "version": "8.0.23"
      },
      "myorcl3:3308": {
        "address": "myorcl3:3306",
        "memberRole": "SECONDARY",
        "mode": "R/O",
        "readReplicas": {},
        "replicationLag": null,
        "role": "HA",
        "status": "ONLINE",
        "version": "8.0.23"
      }
    },
    "topologyMode": "Single-Primary"
  },
  "groupInformationSourceMember": "myorcl2:3306"
}
Cool, now we start it up again:
sudo systemctl start mysql
Then we do a rejoin (at least that’s how I’ve seen it done out there hahaha):
mysql-js > cluster.rejoinInstance('root@myorcl1:3306')
aaaand… there it is:
mysql-js > cluster.status()
{
  "clusterName": "ClusterBrabo",
  "defaultReplicaSet": {
    "name": "default",
    "primary": "myorcl2:3306",
    "ssl": "REQUIRED",
    "status": "OK",
    "statusText": "Cluster is ONLINE and can tolerate up to ONE failure.",
    "topology": {
      "myorcl1:3306": {
        "address": "myorcl1:3306",
        "memberRole": "SECONDARY",
        "mode": "R/O",
        "readReplicas": {},
        "replicationLag": null,
        "role": "HA",
        "status": "ONLINE",
        "version": "8.0.23"
      },
      "myorcl2:3307": {
        "address": "myorcl2:3306",
        "memberRole": "PRIMARY",
        "mode": "R/W",
        "readReplicas": {},
        "replicationLag": null,
        "role": "HA",
        "status": "ONLINE",
        "version": "8.0.23"
      },
      "myorcl3:3308": {
        "address": "myorcl3:3306",
        "memberRole": "SECONDARY",
        "mode": "R/O",
        "readReplicas": {},
        "replicationLag": null,
        "role": "HA",
        "status": "ONLINE",
        "version": "8.0.23"
      }
    },
    "topologyMode": "Single-Primary"
  },
  "groupInformationSourceMember": "myorcl2:3306"
}
But hey, how do I know how many failures my cluster can tolerate? Come on, it’s in the literature, you slacker, check it out:
There is a formula to determine how many failures your cluster can tolerate, where: S = Server, f = number of failures +1, so:
S = 2f + 1
For example (taken from the literature, again)
If you have a cluster with 7 nodes, the failure tolerance is up to 3 🙃
7 = 2f + 1
6 = 2f
2f = 6
f = 6 / 2
f = 3
Now something closer to our world (the broke one, haha), 3 servers:
F = (3 - 1)/2
F = 2 / 2
F = 1
So that’s it. Also, before you kill yourself in lab work or head to production full of doubts, you can use the MySQL InnoDB Cluster SandBox, which is really fun to play with and a nice way to understand a bit of InnoDB Cluster.
There’s a wild little script floating around to create a sandbox easy peasy:
# Introducing InnoDB Cluster
#
# This Python script is designed to set up an InnoDB Cluster in a sandbox.
#
# Note: Change the sandbox directory to match your preferred directory setup.
#
# The steps include:
# 1) Create the sandbox directory
# 2) Deploy instances
# 3) Create the cluster
# 4) Add instances to the cluster
# 5) Show the cluster status
#
# Updated for modern MySQL Shell versions
# Dr. Charles Bell, 2024 (Updated by Assistant)

import os
import time
from mysqlsh import dba, shell  # Import MySQL Shell modules

# Method to deploy a sandbox instance
def deploy_instance(port):
    try:
        dba.deploy_sandbox_instance(
            port,
            {
                'sandboxDir': '/home/user/idc_sandbox',  # Adjusted for Linux/macOS
                'password': 'root'
            }
        )
        print(f"Instance deployed on port {port}")
    except Exception as e:
        print(f"ERROR: Cannot set up the instance in the sandbox on port {port}. Error: {e}")
    time.sleep(1)

# Method to add an instance to the cluster
def add_instance(cluster, port):
    try:
        cluster.add_instance(
            f'root@localhost:{port}',
            {
                'password': 'root',
                'recoveryMethod': 'clone'  # Use 'clone' for modern MySQL versions
            }
        )
        print(f"Instance on port {port} added to the cluster.")
    except Exception as e:
        print(f"ERROR: Cannot add instance on port {port} to the cluster. Error: {e}")
    time.sleep(1)

# Main script
if __name__ == "__main__":
    print("##### STEP 1 of 5 : CREATE SANDBOX DIRECTORY #####")
    sandbox_dir = '/home/user/idc_sandbox'  # Adjusted for Linux/macOS
    if not os.path.exists(sandbox_dir):
        os.mkdir(sandbox_dir)
        print(f"Sandbox directory created at {sandbox_dir}")
    else:
        print(f"Sandbox directory already exists at {sandbox_dir}")

    print("##### STEP 2 of 5 : DEPLOY INSTANCES #####")
    deploy_instance(3311)
    deploy_instance(3312)
    deploy_instance(3313)
    deploy_instance(3314)

    print("##### STEP 3 of 5 : CREATE CLUSTER #####")
    try:
        shell.connect('root@localhost:3311', {'password': 'root'})
        my_cluster = dba.create_cluster(
            'MyCluster',
            {
                'multiPrimary': False  # Updated parameter name for single-primary mode
            }
        )
        print("Cluster 'MyCluster' created successfully.")
    except Exception as e:
        print(f"ERROR: Cannot create the cluster. Error: {e}")
    time.sleep(1)

    print("##### STEP 4 of 5 : ADD INSTANCES TO CLUSTER #####")
    add_instance(my_cluster, 3312)
    add_instance(my_cluster, 3313)
    add_instance(my_cluster, 3314)

    print("##### STEP 5 of 5 : SHOW CLUSTER STATUS #####")
    try:
        shell.connect('root@localhost:3311', {'password': 'root'})
        my_cluster = dba.get_cluster('MyCluster')
        status = my_cluster.status()
        print("Cluster Status:")
        print(status)
    except Exception as e:
        print(f"ERROR: Cannot retrieve cluster status. Error: {e}")
Oh, I almost forgot the handy little commands to administer and monitor the cluster:
// Verificar o status do cluster
cluster.status()

// Verificar o status detalhado de cada nó
cluster.status({extended: true})

// Adicionar um novo nó ao cluster
// Substitua 'senha' pela senha correta do usuário root
cluster.addInstance('root@myorcl4:3306', {password: 'senha'})

// Remover um nó do cluster
// Exemplo: Remover o nó myorcl3:3306
cluster.removeInstance('root@myorcl3:3306', {password: 'senha'})

// Promover um nó secundário a primário (failover manual)
// Exemplo: Promover o nó myorcl3:3306 a primário
cluster.setPrimaryInstance('myorcl3:3306')

// Alterar o modo de topologia para Multi-Primary
cluster.switchToMultiPrimaryMode()

// Alterar o modo de topologia para Single-Primary
cluster.switchToSinglePrimaryMode()

// Reconfigurar o cluster para reintegrar um nó
// Exemplo: Reintegrar o nó myorcl3:3306 ao cluster
cluster.rejoinInstance('myorcl3:3306')

// Remover o cluster completamente
// Nome do cluster: ClusterBrabo
dba.dropCluster('ClusterBrabo')

// Fazer backup de uma instância
// Exemplo: Fazer backup do nó primário myorcl2:3306
util.dumpInstance('root@myorcl2:3306', {password: 'senha', outputUrl: 'file:///backups/cluster_backup'})

// Verificar a configuração do cluster
cluster.describe()

// Atualizar a versão do cluster após atualizar o MySQL
cluster.upgradeMetadata()

// Listar todos os clusters disponíveis no ambiente
dba.getClusters()

// Verificar os nós disponíveis para serem adicionados ao cluster
// Isso ajuda a identificar instâncias MySQL que podem ser configuradas como parte do cluster
dba.checkInstanceConfiguration('root@myorcl4:3306', {password: 'senha'})

// Configurar uma instância MySQL para ser usada no cluster
// Use este comando antes de adicionar uma instância ao cluster
dba.configureInstance('root@myorcl4:3306', {password: 'senha'})

// Verificar a configuração de uma instância específica
// Isso ajuda a diagnosticar problemas de configuração em um nó
dba.checkInstanceConfiguration('root@myorcl3:3306', {password: 'senha'})

// Verificar a replicação entre os nós do cluster
// Isso exibe informações sobre o atraso de replicação e o status de cada nó
cluster.checkInstanceState('myorcl3:3306')

// Alterar o modo de recuperação automática de um nó
// Exemplo: Configurar o nó myorcl3:3306 para tentar se reconectar automaticamente ao cluster
cluster.setInstanceOption('myorcl3:3306', 'autoRejoinTries', 3)

// Alterar o tempo limite de espera para operações de cluster
// Exemplo: Configurar o tempo limite para 60 segundos
cluster.setOption('operationTimeout', 60)

// Verificar as opções configuradas no cluster
cluster.options()

// Verificar as opções configuradas para um nó específico
cluster.getInstanceOptions('myorcl3:3306')

// Forçar a remoção de um nó do cluster
// Use este comando se o nó não puder ser removido normalmente
cluster.forceQuorumUsingPartitionOf('myorcl2:3306')

// Recuperar o quorum do cluster manualmente
// Use este comando se o cluster perder o quorum e precisar ser restaurado
cluster.forceQuorumUsingPartitionOf('myorcl2:3306')

// Verificar o quorum do cluster
cluster.status().defaultReplicaSet.quorumStatus

// Reconfigurar o cluster para tolerar falhas adicionais
// Exemplo: Configurar o cluster para tolerar até 2 falhas
cluster.setOption('memberWeight', 2)

// Atualizar a configuração de replicação do cluster
// Use este comando após alterações na configuração de rede ou replicação
cluster.rescan()

// Verificar o histórico de eventos do cluster
// Isso exibe eventos importantes, como falhas de nós ou mudanças de estado
cluster.status({extended: true}).defaultReplicaSet.events

// Verificar o atraso de replicação de um nó específico
// Isso ajuda a identificar problemas de desempenho na replicação
cluster.status({extended: true}).defaultReplicaSet.topology['myorcl3:3306'].replicationLag

// Verificar o papel de cada nó no cluster
// Isso exibe se o nó é primário ou secundário
cluster.status().defaultReplicaSet.topology['myorcl3:3306'].memberRole

// Verificar o modo de operação de cada nó
// Isso exibe se o nó está em modo de leitura/escrita (R/W) ou somente leitura (R/O)
cluster.status().defaultReplicaSet.topology['myorcl3:3306'].mode
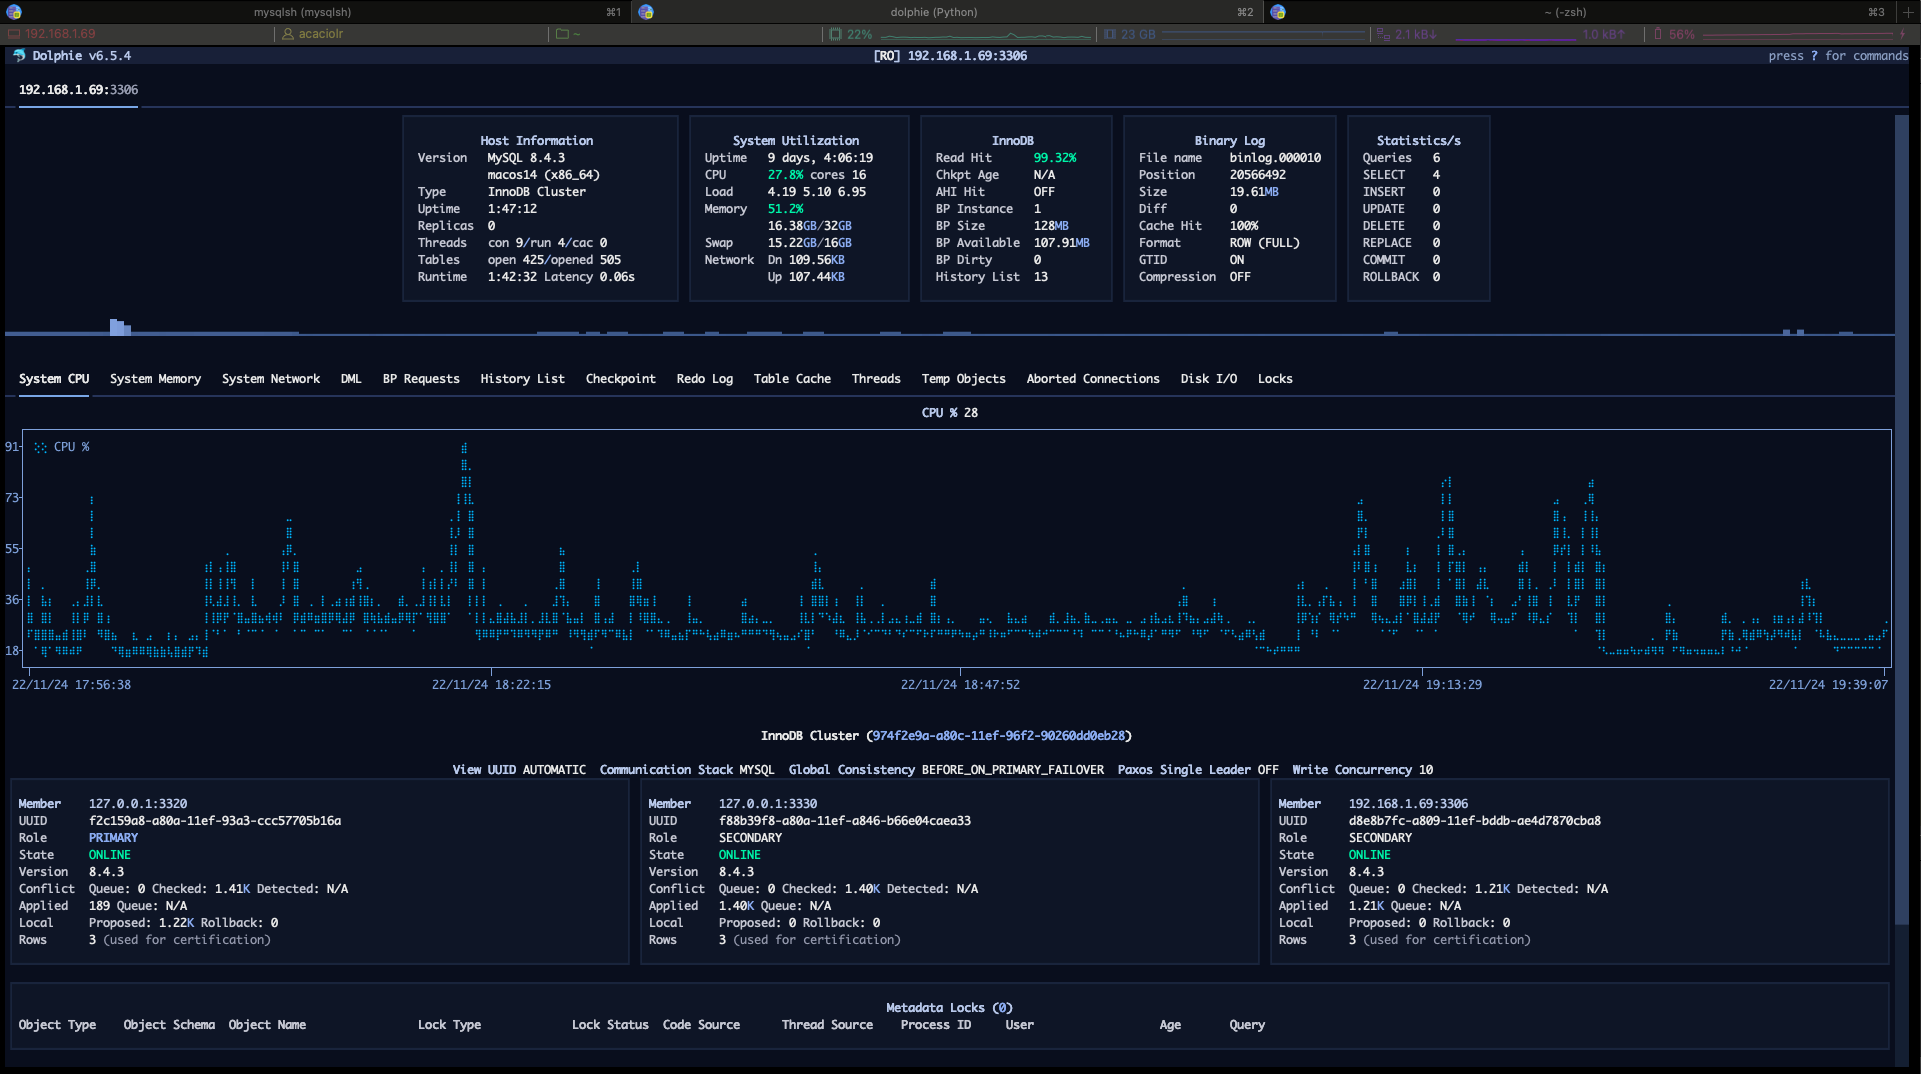
And we still have our best friend for monitoring MySQL, Dolphie:
References for further study
Hope you enjoyed it. If you have any suggestions, fire away, drop them in the comments, and we’ll see each other or talk somewhere out there. 🤘🏾🤘🏾