

Recovering corrupted data blocks in Oracle Database is an essential technique to preserve data integrity without having to restore the entire database. Oracle provides a killer feature for fixing corrupted blocks individually using RMAN, and you can analyze the contents of those blocks through dumps to examine specific records.
⚠️ CONTAINS TEXT IMPROVED BY AI, AND THAT’S OK (IF YOU KNOW HOW TO USE IT 🤭)⚠️
Now a bit about the data block and rowid architecture in Oracle:
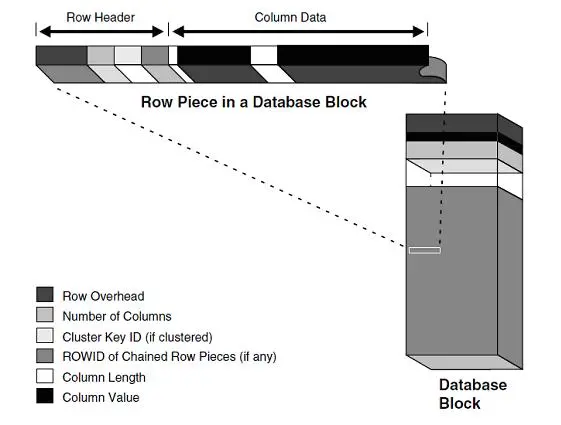
Structure description:
- Database Block: The data block is the smallest unit of storage in Oracle. Inside it, several row pieces are stored, along with control information and metadata that help manage storage.
- Row Piece: A row piece is a portion of a data row that can be complete in a single block or spread across several blocks (chaining or migration). It holds all the information related to the row’s data.
- Row Header: The row header includes control information about the stored row, such as:
- Row Overhead: Space reserved for control information, such as the status of the transaction associated with the row and lock flags.
- Number of Columns: The number of columns stored in the row.
- Column Data:
- Cluster Key ID (if clustered): Identifies the cluster key (when the table is part of a cluster).
- ROWID of Chained Row Pieces (if any): If the row is fragmented across several blocks, the ROWID (row location) of the other row pieces is stored here.
- Column Length: Indicates the size of each column.
- Column Value: The actual column value is stored in this part, where each column has its own length and value.
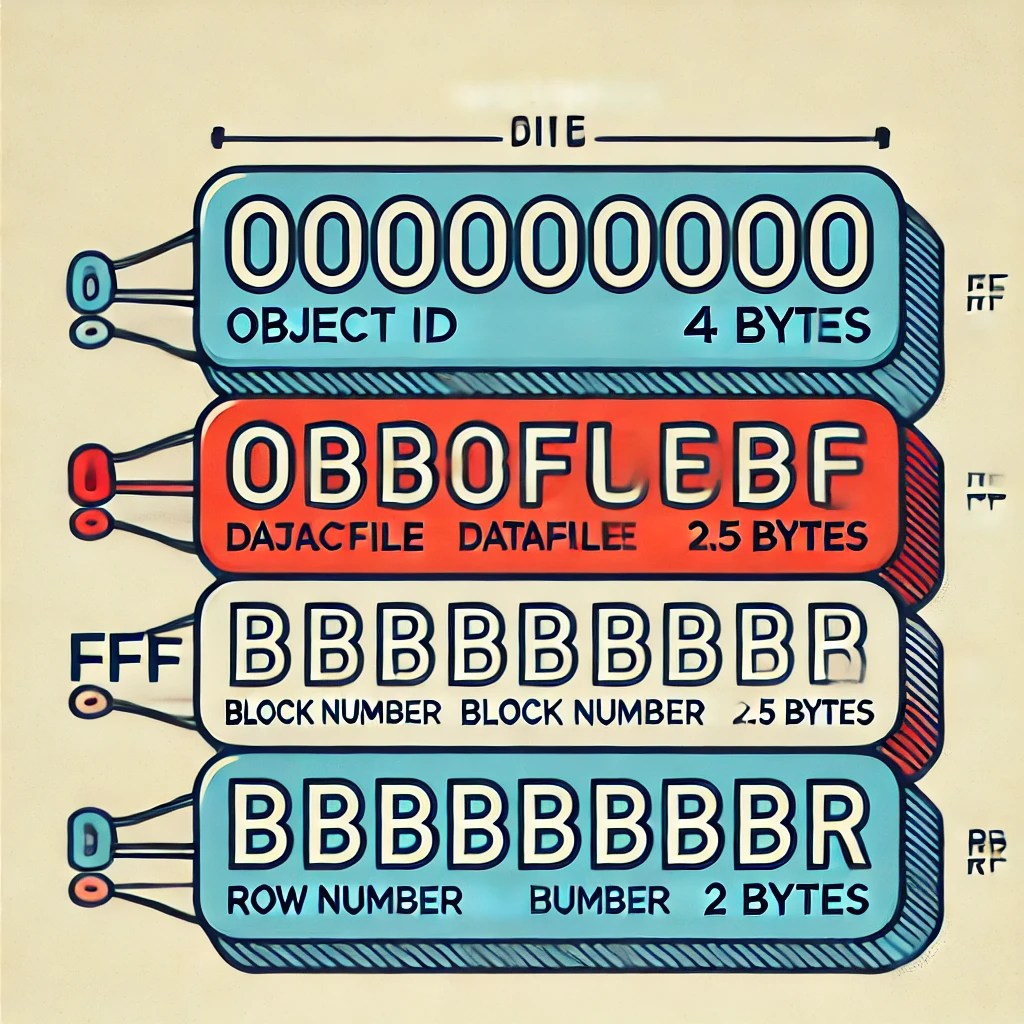
- Object ID (OOOOOOO): Shown in red, 4 bytes in size. This part identifies the object in the database (such as a table or index).
- Datafile Number (OBBOFLEBF): Shown in blue, 1.5 bytes in size. It refers to the number of the datafile where the specific block resides.
- Block Number (BBBBBB): Shown in green, 2.5 bytes in size. It indicates the block number within the datafile where the row is stored.
- Row Number (BBBBBBR): Shown in black, 2 bytes in size. It identifies the specific row within the data block.
1. Identifying corrupted blocks
First, you need to identify the corrupted blocks in the database. Oracle maintains a system table called V$DATABASE_BLOCK_CORRUPTION that lists every block identified as corrupted:
Keep an eye out for this Oracle error:
ORA-01578: ORACLE data block corrupted (file # X, block # Y)
In this error message we can see the identifier of the datafile and of the block in question.
To check the datafile, use this query:
SELECT file_name
FROM dba_data_files
WHERE file_id = <file#>;
To check the corrupted block, you can use:
RMAN> BLOCKRECOVER CORRUPION LIST;
SQL>
COLUMN owner FORMAT A20
COLUMN segment_name FORMAT A30

SELECT DISTINCT owner, segment_name
FROM   v$database_block_corruption dbc
       JOIN dba_extents e ON dbc.file# = e.file_id AND dbc.block# BETWEEN e.block_id and e.block_id+e.blocks-1
ORDER BY 1,2;
This table is populated automatically after integrity checks performed by commands like DBV (Data Block Verifier) or after read errors during database operations.
Another way to check for block corruption is through:
- Alert Log: error messages indicating block read failures.
- DBVERIFY: an external tool that scans datafiles.
dbv file=/path/to/datafile.dbf blocksize=8192
2. Recovering corrupted blocks with RMAN
Once the corrupted block(s) are identified, we can use RMAN for the recovery. The process can be done while the database is open, reducing downtime.
Recovery steps:
- Connect to RMAN:
rman target /
- Run the block recovery command: You can specify the datafile and the block number directly:
RMAN> BLOCKRECOVER DATAFILE 4 BLOCK 12345;
To recover several blocks at once:
RMAN> BLOCKRECOVER DATAFILE 4 BLOCK 12345, 12346, 12347;
- Verify that the blocks were recovered: After running the
BLOCKRECOVERcommand, you can check the V$DATABASE_BLOCK_CORRUPTION view again to make sure the blocks are no longer corrupted:
SQL> SELECT * FROM V$DATABASE_BLOCK_CORRUPTION;
3. Examining data block contents
To understand the contents of a specific data block, Oracle offers a block “dumper” method. This procedure can be useful for checking what is written in the block, such as table records.
Steps to dump a block:
- Identify the block number, datafile number and object where the record is stored. You can use the query below to locate the file and block number of a specific row:
SQL> SELECT tablespace_name, segment_type, owner, segment_name
        FROM dba_extents
       WHERE file_id = <file#>
         AND <block#> BETWEEN block_id AND block_id + blocks - 1;

SQL>
COLUMN ROWID FORMAT A18
COLUMN OB_ID FORMAT 99999
COLUMN FILE_ID FORMAT 9
COLUMN BL_NUM FORMAT 99999
COLUMN ROW_NUM FORMAT 99
COLUMN OWNER FORMAT A2
COLUMN OBJECT_NAME FORMAT A9
COLUMN FILE_NAME FORMAT A71
COLUMN FILE_NAME FORMAT A71
COLUMN TABLESPACE_NAME FORMAT A15
SELECT tr.rowid,
       dbms_rowid.rowid_object(tr.rowid) AS OB_ID,
       dbms_rowid.rowid_relative_fno(tr.rowid) AS FILE_ID,
       dbms_rowid.rowid_block_number(tr.rowid) AS BL_NUM,
       dbms_rowid.rowid_row_number(tr.rowid) AS ROW_NUM,
       ob.owner,
       ob.object_name,
       df.file_name,
       df.tablespace_name
  FROM sys.dba_brabo_tb tr
 INNER JOIN dba_objects ob
    ON ob.object_id = dbms_rowid.rowid_object(tr.rowid)
 INNER JOIN dba_data_files df
    ON df.file_id = dbms_rowid.rowid_relative_fno(tr.rowid)
 WHERE tr.dba_brabo_alunos = 666;
COLUMN file_id          FORMAT 99999                                                       -- Número do arquivo relativo
COLUMN block_id         FORMAT 9999999                                                     -- Número do bloco no arquivo
COLUMN row_number       FORMAT 99999                                                       -- Número da linha no bloco
COLUMN rows_per_block   FORMAT 99999                                                       -- Total de linhas no bloco
COLUMN rowid            FORMAT A18                                                         -- ROWID do registro
COLUMN file_name        FORMAT A50                                                         -- Nome do arquivo de dados
COLUMN block_size_kb    FORMAT 999999                                                      -- Tamanho do bloco em KB
COLUMN total_blocks     FORMAT 999999                                                      -- Total de blocos
COLUMN segment_name     FORMAT A30                                                         -- Nome do segmento
COLUMN total_rows       FORMAT 99999999                                                    -- Total de linhas estimadas
COLUMN avg_row_length   FORMAT 9999                                                        -- Tamanho médio de uma linha

SELECT
    A.ROWID AS row_id,                                                                     -- ROWID do registro
    DBMS_ROWID.ROWID_RELATIVE_FNO(A.ROWID) AS file_id,                                     -- Número relativo do arquivo
    DBMS_ROWID.ROWID_BLOCK_NUMBER(A.ROWID) AS block_id,                                    -- Número do bloco no arquivo
    DBMS_ROWID.ROWID_ROW_NUMBER(A.ROWID) AS row_number,                                    -- Número da linha dentro do bloco
    COUNT(*) OVER (PARTITION BY DBMS_ROWID.ROWID_BLOCK_NUMBER(A.ROWID)) AS rows_per_block, -- Total de linhas no bloco
    T.FILE_NAME AS file_name,                                                              -- Nome do arquivo de dados correspondente
    T.BYTES/1024 AS block_size_kb,                                                         -- Tamanho do bloco em KB
    T.BLOCKS AS total_blocks,                                                              -- Total de blocos alocados
    B.SEGMENT_NAME AS segment_name,                                                        -- Nome do segmento associado
    S.NUM_ROWS AS total_rows,                                                              -- Total de linhas estimadas na tabela
    S.AVG_ROW_LEN AS avg_row_length                                                        -- Tamanho médio de uma linha na tabela
FROM
    DBA_BRABO_TB A
LEFT JOIN
    DBA_DATA_FILES T
ON
    T.RELATIVE_FNO = DBMS_ROWID.ROWID_RELATIVE_FNO(A.ROWID)                                -- Relaciona arquivo relativo com DBA_DATA_FILES
LEFT JOIN
    DBA_SEGMENTS B
ON
    B.SEGMENT_NAME = 'DBA_BRABO_TB' AND B.OWNER = 'SEU_OWNER'                         -- Ajuste o OWNER conforme necessário
LEFT JOIN
    DBA_TABLES S
ON
    S.TABLE_NAME = 'DBA_BRABO_TB' AND S.OWNER = 'SEU_OWNER'                           -- Ajuste o OWNER conforme necessário
WHERE
    ROWNUM <= 1000
ORDER BY
    file_id, block_id, row_number;
- Use the
ALTER SYSTEM DUMPcommand to dump the block: To dump the block, use the following command:
The ALTER SYSTEM DUMP DATAFILE command is an Oracle instruction that lets you extract detailed information about a specific block inside a datafile. This instruction is used to diagnose block corruption issues, understand the block structure, or get details about the data held in a specific block in the database.
SQL> ALTER SYSTEM DUMP DATAFILE 4 BLOCK 12345;
This will generate a dump file in the Oracle log directory, usually located at $ORACLE_HOME/diag.
- Analyze the dump file: The dump contains hexadecimal information and detailed records about the block contents. The dump will include headers, active or inactive transactions, and the actual data written in that block.
- This is old stuff, from back around Oracle 7 and 8, but it still works.
Dump file /u01/app/oracle/diag/rdbms/dbabrabo/trace/orcl_ora_12345.trc
Oracle Database 19c Enterprise Edition Release 19.0.0.0.0 - Production
With the Partitioning, OLAP, Data Mining and Real Application Testing options
ORACLE_HOME = /u01/app/oracle/product/19.0.0/dbhome_1
System name:    Linux
Node name:      dbabrabo01
Release:        4.18.0-80.el8.x86_64
Version:        #1 SMP Wed Apr 24 11:50:52 EDT 2019
Machine:        x86_64
Instance name: dbabrabo01
Redo thread mounted by this instance: 1
Oracle process number: 45
Unix process pid: 12345, image: oracle@dbabrabo01

*** 2024-10-21 14:35:10.123456 +00:00
*** SESSION ID:(12345.6789) 2024-10-21 14:35:10.123456
*** CLIENT ID:() 2024-10-21 14:35:10.123456
*** SERVICE NAME:(SYS$USERS) 2024-10-21 14:35:10.123456
*** MODULE NAME:(sqlplus@dbabrabo01 (TNS V1-V3)) 2024-10-21 14:35:10.123456
*** ACTION NAME:() 2024-10-21 14:35:10.123456

Start dump data blocks tsn: 4 file#: 4 minblk 12345 maxblk 12345
Block dump from cache:
Dump of buffer cache at level 4 for tsn=4 rdba=16777221

buffer tsn: 4 rdba: 0x01003039 (4/12345)
scn: 0x0000.01234567 seq: 0x01 flg: 0x06 tail: 0x567890ab
frmt: 0x02 chkval: 0xa1d7 type: 0x06=trans data

Block header dump:  0x01003039
 Object id on Block? Y
 seg/obj: 0x456789  csc: 0x00.12345678  itc: 3  flg: O-
  brn: 0  bdba: 0x01003038 ver: 0x01 opc: 0
  inc: 0  exflg: 0

Itl Xid Uba Flag Lck Scn/Fsc
0x01 0x0009.001.00001234 0x01800012.3456789f C---    0 scn 0x0000.01234567
0x02 0x0012.002.00004567 0x01800012.345679ab --U-    2 scn 0x0000.01234568
0x03 0x0034.001.00007890 0x01800012.34567abc ----    3 scn 0x0000.01234569

Data Block:
-----------------------------------------------------------------------------
tsiz: 0x1fa0
flag: 0x2
nrid:  0x01003039
col  0: [ 3]  c1 02 03
col  1: [ 2]  c1 04
col  2: [ 4]  c1 05 c1 06
col  3: [ 8]  c2 01 00 00 00 07 08 09
row#0[8018] flag: C
lock: 2
col  0: [ 2] 80 80
col  1: [ 6] 80 80 81 81 82 82
col  2: [ 1] 80
col  3: [ 3] 00 00 00
In this example, the dump shows the block header, object identifiers, transaction states, and change records. This can be useful when you need to analyze the cause of the corruption or the state of an in-flight transaction.
Block header dump: 0x010032a8: The header of the block being dumped. The0x010032a8value is the hexadecimal address of the block.Object id on Block? Y: Indicates that there is an object ID associated with the block (in this case, “Y” for “Yes”).seg/obj: 0x19b8: This is the segment or object identifier (object ID 0x19b8).csc: 0x00.2f4c43: This is the SCN (System Change Number) for the block.itl: 2: Indicates the number of interested transaction list (ITL) slots in the block. This means up to 2 transactions can be tracked inside the block.Itl Xid Uba Flag Lck Scn/Fsc: These are the details of the active transactions in the block:- Xid: Transaction ID.
- Uba: Undo Block Address.
- Flag: Flags indicating the transaction status (
Cmeans committed). - Lck: Lock.
- Scn/Fsc: System Change Number or Free Space Checkpoint.
data_block_dump,data header at 0x7f5f332e900: Start of the data dump in the block. The data header address starts at0x7f5f332e900.tsiz: 0x1f78: The size of the data block.checksum: 0x39cb: The block checksum, used to ensure data integrity.
4. Recovery using an incremental backup (optional)
If you do not have a backup of the specific block, or if RMAN cannot recover the blocks for any reason, you can use an incremental backup to recover corrupted blocks:
- Take an incremental backup of the database:
RMAN> BACKUP INCREMENTAL LEVEL 1 DATABASE;
- Run the recovery based on the incremental backup:
RMAN> RECOVER BLOCK DATAFILE 4 BLOCK 12345;
This approach applies healthy blocks from the incremental backup, fixing the corrupted blocks in the production database.
5. Verifying the block fix
After the recovery, Oracle automatically runs a validation to make sure the block was restored correctly. However, you can validate manually using the command:
Standard version (without ASM):
dbv file=/path/to/datafile.dbf blocksize=8192
DBVERIFY: Release 19.0.0.0.0 - Production on Mon Oct 21 14:42:33 2024

Copyright (c) 1982, 2024, Oracle.  All rights reserved.

DBVERIFY - Verification starting : FILE = /path/to/datafile.dbf
DBVERIFY - Verification complete

Total Pages Examined         : 64000
Total Pages Processed (Data) : 32000
Total Pages Failing   (Data) : 0
Total Pages Processed (Index): 16000
Total Pages Failing   (Index): 0
Total Pages Processed (Other): 16000
Total Pages Processed (Seg)  : 0
Total Pages Empty            : 0
Total Pages Marked Corrupt   : 0
Total Pages Influx           : 0
Highest block SCN            : 1123456789 (0.1123456789)
ASM version:
dbv USERID=SYS/***** file=+DATAC1/datafiles/users01.dbf logfile=/tmp/dbv_dbabrabo.log
DBVERIFY: Release 19.0.0.0.0 - Production on Mon Oct 21 15:35:12 2024

Copyright (c) 1982, 2024, Oracle.  All rights reserved.

DBVERIFY - Verification starting : FILE = +DATAC1/datafiles/users01.dbf
DBVERIFY - Verification complete

Total Pages Examined         : 32000
Total Pages Processed (Data) : 16000
Total Pages Failing   (Data) : 0
Total Pages Processed (Index): 8000
Total Pages Failing   (Index): 0
Total Pages Processed (Other): 8000
Total Pages Empty            : 0
Total Pages Marked Corrupt   : 0
Total Pages Influx           : 0
Highest block SCN            : 123456789 (0.123456789)
This will confirm the block was fixed with no further errors.
6. Recovering corrupted blocks with DBMS_REPAIR
Examples from the master Tim Hall
Oracle’s DBMS_REPAIR package lets you identify and handle corrupted blocks in the database. Unlike other methods, it not only detects them but also lets you “mark” damaged blocks to be skipped by DML operations.
Creating the administrative tables
To manage corrupted blocks, two administrative tables must be created: one to store information about the corrupted blocks and another to hold orphan index keys.
BEGIN
  DBMS_REPAIR.admin_tables (
    table_name => 'TBL_CORRUPCAO',
    table_type => DBMS_REPAIR.repair_table,
    action     => DBMS_REPAIR.create_action,
    tablespace => 'USERS');

  DBMS_REPAIR.admin_tables (
    table_name => 'CHAVES_ORFAS',
    table_type => DBMS_REPAIR.orphan_table,
    action     => DBMS_REPAIR.create_action,
    tablespace => 'USERS');
END;
/
Checking the table for corruption
Once the administrative tables are created, the CHECK_OBJECT routine can be used to check for corrupted blocks in a specific table.
SET SERVEROUTPUT ON
DECLARE
  v_blocos_corrompidos INT;
BEGIN
  v_blocos_corrompidos := 0;
  DBMS_REPAIR.check_object (
    schema_name       => 'DBABRABO',
    object_name       => 'CLIENTES',
    repair_table_name => 'TBL_CORRUPCAO',
    corrupt_count     => v_blocos_corrompidos);
  DBMS_OUTPUT.put_line('Blocos corrompidos detectados: ' || TO_CHAR(v_blocos_corrompidos));
END;
/
Marking corrupted blocks
If there are corrupted blocks, they can be “marked” to be skipped during DML operations.
SET SERVEROUTPUT ON
DECLARE
  v_blocos_corrigidos INT;
BEGIN
  v_blocos_corrigidos := 0;
  DBMS_REPAIR.fix_corrupt_blocks (
    schema_name       => 'DBABRABO',
    object_name       => 'CLIENTES',
    object_type       => DBMS_REPAIR.table_object,
    repair_table_name => 'TBL_CORRUPCAO',
    fix_count         => v_blocos_corrigidos);
  DBMS_OUTPUT.put_line('Blocos marcados como corrompidos: ' || TO_CHAR(v_blocos_corrigidos));
END;
/
Identifying orphan keys in indexes
After marking the corrupted blocks, the associated indexes must be checked to identify orphan keys.
SET SERVEROUTPUT ON
DECLARE
  v_chaves_orfas INT;
BEGIN
  v_chaves_orfas := 0;
  DBMS_REPAIR.dump_orphan_keys (
    schema_name       => 'DBABRABO',
    object_name       => 'IDX_CLIENTES',
    object_type       => DBMS_REPAIR.index_object,
    repair_table_name => 'TBL_CORRUPCAO',
    orphan_table_name => 'CHAVES_ORFAS',
    key_count         => v_chaves_orfas);
  DBMS_OUTPUT.put_line('Chaves órfãs detectadas: ' || TO_CHAR(v_chaves_orfas));
END;
/
If orphan keys exist, the index must be rebuilt to fix the problem.
Rebuilding the freelists
Blocks marked as corrupted are automatically removed from the freelists. However, this can cause access problems for the blocks that follow, so the freelists need to be rebuilt.
BEGIN
  DBMS_REPAIR.rebuild_freelists (
    schema_name => 'DBABRABO',
    object_name => 'CLIENTES',
    object_type => DBMS_REPAIR.table_object);
END;
/
Skipping corrupted blocks
To make sure corrupted blocks are skipped during DML operations, use the SKIP_CORRUPT_BLOCKS routine.
BEGIN
  DBMS_REPAIR.skip_corrupt_blocks (
    schema_name => 'DBABRABO',
    object_name => 'CLIENTES',
    object_type => DBMS_REPAIR.table_object,
    flags       => DBMS_REPAIR.skip_flag);
END;
/
Bonus: BBED (for you to play with in your LAB[ONLY])
                             ______
                          .-"      "-.
                         /            \
             _          |              |          _
            ( \         |,  .-.  .-.  ,|         / )
             > "=._     | )(__/  \__)( |     _.=" <
            (_/"=._"=._ |/     /\     \| _.="_.="\_)
                   "=._ (_     ^^     _)"_.="
                       "=\__|IIIIII|__/="
                      _.="| \IIIIII/ |"=._
            _     _.="_.="\          /"=._"=._     _
           ( \_.="_.="     `--------`     "=._"=._/ )
            > _.="                            "=._ <
           (_/                                    \_)
The BBED (Block Browser and Editor) utility is an internal Oracle tool that lets you view and modify data blocks at the physical level. However, Oracle does not officially support BBED for production use, since it can be very dangerous if used incorrectly: it allows block modification at the lowest level, which can corrupt data if used recklessly.
That said, here is an overview and examples of how you can use BBED for corrupted block recovery in Oracle. BBED is not distributed by default, but it can be built from the Oracle Binary. I will include the steps to set it up and some usage examples.
1. Preparing BBED:
- Check whether BBED is available in your Oracle environment. It is often disabled, but you can enable it if you find the binary.
- The BBED executable can usually be found at
$ORACLE_HOME/rdbms/admin/bbed.parand$ORACLE_HOME/rdbms/admin/bbedus.msb.
- Copy and compile BBED:
- Copy the
bbedfile to a working directory. - Make sure the
bbed.parandbbedus.msbfiles are in the same directory as thebbedbinary. - Grant execute permissions to the binary:
chmod +x bbed
- Create a parameter file (
bbed.par):
The parameter file is needed to provide information about the block size, datafile, and other details. Example of thebbed.parcontents:
   blocksize=8192
   listfile=/tmp/datafiles.lst
   mode=edit
- List file (
datafiles.lst):
Create a list file of the datafiles you want to open with BBED.
   /path/to/datafile1.dbf
   /path/to/datafile2.dbf
Now BBED is configured and ready to use.
2. Basic BBED commands:
Let’s look at some basic command examples for block recovery.
2.1. Loading BBED and accessing a block:
- Start BBED:
$ bbed parfile=/path/to/bbed.par
This loads BBED and the specified parameter file.
- Open a specific block: To navigate to and view a specific block in the datafile, you need to access the datafile and the number of the block you want to inspect.
BBED> set dba 4,12345
Where 4 is the datafile number, and 12345 is the block number.
- List the block data: After setting the DBA, you can view the block contents:
BBED> map
This command shows a general map of the block, such as the block header, in-flight transactions, and other metadata.
- List the block contents: To display the block contents in hexadecimal format, you can use the
dumpcommand.
BBED> dump
This command displays the block contents as a list of hexadecimal and ASCII data. You can use this to analyze the corrupted data or understand the current state of the block.
2.2. Corrupted block recovery example:
Let’s assume you have identified that the block is corrupted and need to change it to recover it.
- Identify the corruption:
When viewing the block, you can check for corrupted or invalid fields. Let’s suppose the block header is corrupted. - Edit the block header: The block header field can be edited directly. Suppose you need to adjust the
kcbh.seqfield (block header sequence). You can adjust this manually. First, locate the offset (offset) of thekcbh.seqfield.
BBED> p kcbh.seq
This prints the current value of the kcbh.seq field. Now, if it is incorrect, you can fix the value:
BBED> modify /x 0004 at kcbh.seq
This changes the field value to 0004.
- Save the changes: Once you have made the modification, you can write the block back to the datafile.
   BBED> sum
   BBED> write
The sum command computes the checksum of the modified block, and write writes the block back to the datafile.
3. Listen up, rookie:
- BBED is extremely dangerous: A single incorrect modification can permanently corrupt your database data. Always take a full backup before using this tool.
- The tool is not officially documented: Oracle does not support BBED, and it should be used only in extreme cases or in test environments.
Although BBED can be a useful tool for in-depth analysis and modification of physical data blocks, it must be used with extreme care and preferably in test environments. In production, Oracle offers safer, supported alternatives, such as RMAN and DBMS_REPAIR, for recovering corrupted blocks.
Final thoughts
Oracle data block recovery is an extremely useful capability that avoids prolonged downtime and the need for a full restore. In addition, the ability to dump blocks can be used for forensic analysis, helping resolve critical data integrity issues.
Important tips:
- Always keep backups up to date.
- Periodically check for block corruption using tools such as DBVERIFY and RMAN.
- Always follow procedures and standards based on the documentation, and check with support.
- Test and practice extreme scenarios so you know how to work around a crisis.
- Automate corrupted block checking and recovery with RMAN to minimize downtime.